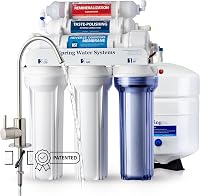
How to Install Under Sink Reverse Osmosis
To install under sink reverse osmosis, shut off the cold-water supply, mount the faucet and drain connection, then connect the filter, tank, and tubing according to the system manual. Flush the filters and check every connection for leaks before drinking the water.
On this page (9 sections)
- What should you check before installing an under sink reverse osmosis system?
- How do you shut off the water and mount the RO faucet?
- How do you connect the cold-water feed?
- How do you connect the drain line?
- How do you connect the filters, tank, and tubing?
- How do you start and flush the system?
- What should you check after installation?
- When should you call a plumber?
- How do you install under sink reverse osmosis successfully?
To install under sink reverse osmosis, shut off the cold-water supply, mount the faucet and drain connection, then connect the filters, tank, and tubing in the order shown by the system manual. Flush the system and check every joint for leaks before drinking the water.
The exact steps depend on your sink, drain, and filter layout. Set aside time to read the manual and confirm the included fittings match your plumbing before taking anything apart.
What should you check before installing an under sink reverse osmosis system?
Check cabinet space, the sink opening, and the drain connection before installation. A tank system needs room for both the filter assembly and its storage tank, plus space to reach shutoff valves and fittings.
Clear out the cabinet and measure the available height, width, and depth. Compare those measurements with the system dimensions, leaving room to change filters and inspect tubing.
Look for an unused faucet hole or confirm that the sink surface can accept a new one. A soap dispenser opening may work only if its size and location suit the RO faucet.
Read the instructions for your specific setup. Our under sink reverse osmosis systems guide explains what to consider when choosing a system for your cabinet and kitchen.
Which tools and parts should you have ready?
Gather the manual, a bucket or towel, and the tools the manufacturer lists. Common tasks include tightening supply connections, mounting the faucet, and securing tubing, but the needed tools vary by system and sink.
Check the box for the filter assembly, storage tank, faucet, tubing, adapters, and drain parts. The APEC ROES-50 includes a filter set, faucet, tank, installation kit, and instructions.
The system uses colored tubing and quick connection fittings, which can help you identify and connect lines. Confirm that the included parts suit your sink and plumbing before starting.
If you need to buy separate tubing or push-fit parts, match the size to the system. ESHIONG's fittings are for 1/4 in tubing, and the maker advises checking the line size before ordering.
Don't assume a fitting is compatible based only on how it looks. Check the manual and measure the existing line where needed.
How do you shut off the water and mount the RO faucet?
Close the cold-water shutoff valve and relieve pressure before disconnecting a supply line. Keep a towel or small container below the valve because some water may remain in the line.
Turn on the cold tap briefly to release pressure, then turn it off. If the shutoff valve won't close or begins to leak, stop and have it repaired before continuing.
Choose the faucet location and check beneath it for clear space. If you need to drill a new hole, follow the sink or countertop maker's instructions; use a qualified installer for hard surfaces that need special tools.
Install the faucet's gasket and mounting hardware in the order shown in the manual. Tighten it securely, but don't over-tighten parts that could crack or damage the sink.
The iSpring RCC7AK-BN has a top-mounted fastener designed to let you install its faucet from above the countertop. Its instructions include a step-by-step setup, but you still need to confirm that the faucet opening fits your sink.
How do you connect the cold-water feed?
Connect the RO feed line to the cold-water supply using the adapter and sequence in the manual. Never connect an under sink drinking-water system to a hot-water line.
Place a towel under the shutoff valve, then disconnect the cold-water line only after confirming the valve is closed. Install the system's feed adapter as directed and reconnect the household line.
Leave the RO feed valve closed while you finish the other connections. This makes it easier to check the tubing layout before water enters the system.
If the adapter doesn't match the valve or supply line, stop and identify the size and thread type. Forcing mismatched fittings can damage threads or lead to a leak.
How do you connect the drain line?
Connect the RO drain line to the system's approved drain connection, following the manual. Some systems use a drain saddle on the sink drain; others may allow a compatible adapter at a garbage disposal.
If your system includes a drain saddle, place it at the specified position and make sure the connection doesn't obstruct the drain. Follow the instructions for drilling or attaching the saddle, and avoid damaging the pipe.
A disposal adapter may be an option only when the system and disposal arrangement support it. The Watts Drain Adapter Kit is made to connect an RO drain line to a garbage disposal, but check the kit's fit with your drain and hose before using it.
Keep the drain tube routed without kinks or sharp bends. A pinched line can interfere with drainage, so check its path before securing it.
How do you connect the filters, tank, and tubing?
Connect each tube to the labeled port shown in the system diagram. RO systems use several lines, and a wrong connection can prevent normal operation or cause water to flow where it shouldn't.
Place the filter assembly upright in an accessible spot, using the manual's mounting clearances. Leave enough room beneath filter housings to remove them during maintenance.
Set the storage tank where it can stand securely and remain accessible. Attach its valve and tubing as instructed, and don't block the space needed to check or service the tank.
Measure each tube run before cutting. Use a clean, square cut and insert the tube fully into the correct fitting; follow the fitting instructions for its locking clip or collar.
The ESHIONG push-fit fitting set may suit systems that use 1/4 in tubing. Confirm the tubing size and fitting purpose against your manual before adding any extra parts.
How can you keep tubing connections secure?
Use the supplied tubing and fittings wherever possible, and check that each tube is seated as instructed. Pull gently on the line only if the manual recommends a seating check.
Keep lines separated and easy to trace. Avoid sharp bends, rubbing against cabinet edges, and placing tubing where stored items could crush it.
Don't add an extra connector just to make an awkward run reach. Use only compatible parts, and contact the system maker if the supplied layout doesn't fit your cabinet.
How do you start and flush the system?
Open the feed water slowly and inspect every connection before flushing. If you see a drip, close the feed valve, dry the joint, and correct the connection before continuing.
Follow the startup sequence in the manual. It may specify how to open the tank valve, flush the system, and discard the first tank or tanks of water.
Flush for the stated time and cycles, even if the water looks clear. New filters and membranes need the maker's startup procedure before the system is ready for drinking water.
Check under the sink again after the first tank fills and empties. Also inspect the faucet base and drain connection while water is flowing.
If the tank doesn't fill as expected, use the system's troubleshooting steps and see our guide to common causes of an RO tank not filling.
What should you check after installation?
Check for leaks, kinks, and loose tubing after startup and again later that day. Dry the cabinet floor before checking so new drips are easy to spot.
Look around the feed adapter, filter ports, tank valve, faucet base, and drain connection. If you find water, shut off the feed and trace the leak before using the system.
Keep the manual with your maintenance notes. It shows the filter order and the maker's replacement schedule.
When it's time to change a cartridge, follow our guide to changing an under sink water filter cartridge. For RO-specific intervals, see how often to change reverse osmosis filters.
When should you call a plumber?
Call a plumber if a shutoff valve, drain fitting, or countertop hole needs work beyond your comfort level. A professional can also help when the existing plumbing doesn't match the adapters included with your system.
Stop if a valve leaks after closing, a pipe shifts, or you can't identify the correct cold-water line. Don't keep tightening a fitting that resists or leaks; the wrong tool or adapter can make the problem worse.
If the system runs but pressure is low, check the startup steps and tubing route first. Our guide to low reverse osmosis water pressure covers other common causes.
How do you install under sink reverse osmosis successfully?
For a straightforward installation, confirm the fit, follow the system's connection diagram, and inspect every joint before drinking the water. Choose a system with included parts that suit your sink, and use only tubing and fittings that match its specified sizes.
The APEC ROES-50 includes a faucet, tank, installation kit, and instructions. The iSpring RCC7AK-BN has a top-mounted faucet fastener, while the Watts adapter may suit a compatible disposal connection.
If your cabinet or drain setup needs extra parts, verify compatibility before buying them. Then follow the manual's flush schedule and check the system for leaks after the first tank cycle.
Frequently asked questions
Can I install an under sink reverse osmosis system myself?
Many under sink RO systems are designed for DIY installation, but the job still involves water connections, a drain line, and often a faucet hole. Read the system manual and check the sink and cabinet setup first.
Call a plumber if you can't safely shut off the supply or adapt the drain.
Do I need to drill a hole for an RO faucet?
You need a suitable opening for the RO faucet, unless your sink or countertop has an unused compatible hole. Some systems include a faucet, but countertop materials and hole sizes vary.
Check the faucet and sink instructions before drilling, and use a qualified installer for stone or other difficult surfaces.
How long should I flush a new reverse osmosis system?
Flush the system for the time and number of tank cycles specified in its manual. New filters and the membrane need this initial rinse, and the tank may need to be filled and emptied more than once.
Don't drink the water until the maker's startup steps are complete.
Why is my new reverse osmosis system leaking?
A leak often comes from a loose connection, a tube that isn't fully seated, or a fitting that doesn't match the tubing. Shut off the feed water, dry the area, and inspect each joint without forcing it.
If the leak continues, follow the maker's troubleshooting steps or contact a plumber.